Electric Aircraft Battery Mounting Methods
November 1, 2000 for Sailplane & Electric Modeler Magazine
In most electric airplanes, the battery represents about one third of the total weight of the model. It is a very heavy piece of cargo, that must be held securely in place. A shift in its position can seriously alter the center of gravity of the model, potentially making it unflyable (especially if the model uses a BEC, and the battery falls out of the plane completely).
At the same time, it must be easily removable so that we can change the battery between flights instead of having to wait for it to cool down and then recharge it in the plane.
Constraints and Principles
In addition to the requirement that the battery not move during flight, there are several other things to keep in mind when deciding on a battery mounting method.
The battery should be kept away from the receiver and possibly the servos, to reduce the likelihood of electrical noise being transmitted to the receiver and interfering with proper reception (see my May 2000 column, Electromagnetic Interference Reduction).
Provision should be made for cooling air to pass over the battery. A battery that runs hot will have a shorter service life than one that is kept cool. This is especially true of packs made from non high-rate cells, such as 600AE, 1400AE, etc., which have a higher internal resistance, and thus run hotter than similar sized R-series cells such as 500AR, 800AR, 1700SCR, etc.
In the event of a crash, the battery should not destroy any expensive equipment, such as your receiver, speed control, or servos.

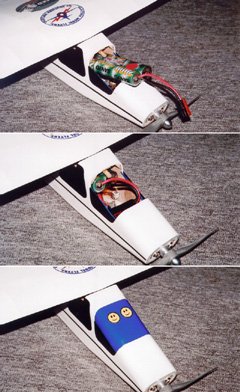
The Flit uses Velcro to hold the battery, with pressure from the hatch ensuring that it can’t pull away. The battery hatch is underneath, with the Velcro on the bottom surface of the wing center.
There is virtually nothing you can do to prevent the battery from moving forwards during a bad crash, so the only way to protect your equipment is to keep it out of the path the battery will take. If possible, don’t install any equipment other than the motor in front of the battery.
Alternatively, design the battery mounting method so that the battery has an easy way out of the aircraft, doing a minimal amount of damage along the way. Allowing the battery to be ejected from the model during a crash will reduce the damage to the rest of the model because the airframe will not have to absorb the momentum of the battery.
A Look at Various Mounting Methods
Let’s take a close look at the mounting methods used in some models, and the advantages and disadvantages of each.
Spectra
The Great Planes Spectra is a 2-meter electric sailplane intended for a 7-cell sub-C battery (e.g. RC1700, RC2000, or RC2400). Such a battery weighs about 14oz (400g), about 28% of the total weight of the plane. The mounting method used in the Spectra is simple. The battery is slid in through the canopy, over a bulkhead, and laid down on the fuselage floor under the wing. It is held by a strip of Velcro® hook-and-loop fastener glued to the battery, and matching pieces glued to the fuselage floor.
Velcro doesn’t seem like a very secure way to hold such a heavy object, but the only direction the battery can move is straight up, and it’s very hard to separate two Velcro pieces by pulling straight away when you can’t actually peel them. On the other hand, it still comes apart easily enough that it’s not hard to remove the battery. I’ve found this arrangement to work quite well in practice and have never had a battery come loose in flight or during a rough landing.
On the negative side, this arrangement does nothing to protect your equipment in the event of a serious crash. If the model were to hit the ground nose first at high speed, the Velcro will let go, and the battery will tear the bulkhead out of the fuselage. Right in front of this bulkhead are the receiver and speed control. In a less severe crash, if the bulkhead manages to restrain the battery, then the airframe must absorb the momentum of the battery, meaning more damage to the model.
Flit
My Speed 280 powered Flit aerobatic model uses a method similar to that in the Spectra, except that the bulkhead has an opening large enough for the battery to pass through. The bottom hatch presses the battery firmly against the Velcro on the underside of the wing. Furthermore, the piece of Velcro is as big as the one in the Spectra, yet the battery pack weighs only 3oz (85g), which is about 33% of the plane’s all-up weight. In the event of a severe crash, the Velcro will allow the pack to move only a short distance, protecting the speed control which is in front of the pack.

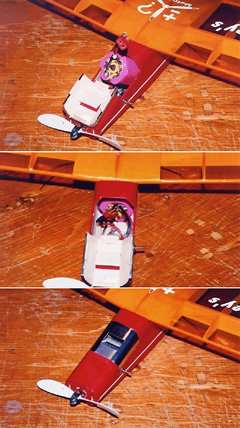
Vernon Williams’ Fred’s Special design uses a battery chute. The battery’s path into (or out of) the plane is a straight line, obstructed only by a pop-off canopy.
Unfortunately, since the pack is held fairly securely, the rest of the airframe must absorb its momentum, resulting in more crash damage to the model. I experienced one crash due to a defective servo (which suddenly gave me full down elevator from about 10ft altitude), and the pack did not move significantly. Damage wasn’t extensive, but the ground was soft.
The only cooling air available in the Flit is that which comes in through the inlet over the motor. It’s not much, but the packs don’t seem very warm after a flight. With a full-throttle static current draw of only 5A, and a partial throttle in-flight draw about half that, not much cooling air seems to be needed.
Fred’s Special
The Fred’s Special is a Speed 600 powered, 46.5" (1.2m), 48oz (1.4kg) four channel sport model designed by Vernon Williams. Power is from seven sub-C sized cells. Weight and battery wise, it has the same characteristics as the Spectra. The battery mounting arrangement is completely different, and one of the best I’ve seen.
The battery is inserted through the canopy, and slides into a chute. It does not have to negotiate any corners or pass over or under any bulkheads on the way in. There is just enough room in the chute that the battery can be held there by a piece Velcro on one side of the pack near the front end, and a corresponding piece on the floor of the chute. Inserting the battery is just a case of sliding it and pressing it against the Velcro. Removing it a matter of pulling it out.
I’ve had a number of crashes, some more serious than others. (This is in no way a reflection of the plane’s design. This was my first non-sailplane, I had no instructor, and it’s still the plane I fly more than any of my others. Actually, the fact that it’s still flying after four years is a tribute to its design.) In every one of these crashes, the battery just slid up the ramp and popped off the canopy. In the bad crashes, the battery left the plane completely and unplugged itself. In the mild crashes and really bad landings, it just came most of the way out. In all cases, damage was far less than it would have been had the battery remained inside the plane.
Cooling air comes from the front of the plane, through inlet holes in the firewall around the motor.

In the Sydney’s Special, the battery is held only with Velcro, on a platform under the wing. So far, it has never let go, even in a crash. Notice the large cooling inlet in the canopy.
Sydney’s Special
The Sydney’s Special is my scaled down, slightly modified, Speed 400 powered version of the Fred’s Special. It uses a pack of seven Sanyo 1100AAU cells, for a battery weight of about 6oz (170g), representing about 33% of the total weight.
In this model, the battery is inserted through a front canopy hatch, slid over a bulkhead and onto a platform, where again, it is held by Velcro. As a matter of fact, the Velcro is the only thing holding it. The speed control is in front of, and slightly below the battery. This arrangement makes it easy to change packs between flights.
I’ve only crashed the model once, and the pack didn’t move very far, so this method seems adequately secure. I think this is because the pack tends to tip forwards and catch on the upper bulkhead, preventing it from becoming completely unstuck. Unfortunately, this again means that the airframe has to absorb more of the impact.
Because the 1100AAU cells have a higher internal resistance than the 500AR cells usually used for Speed 400 applications, they require more airflow to keep cool. In addition to the front cooling holes as in the Fred’s Special, I cut a fairly large air intake ramp into the canopy, which directs copious amounts of air over and through the battery pack. This resulted in very noticeably cooler packs after the end of a flight.
SlowPoke – Before and After
In the July 2000 issue, I reviewed the Great Planes SlowPoke, and described its conversion to e-power (of course). At that time, I came up with a battery mounting arrangement that is sort of a backwards and upside-down version of what’s in the Fred’s Special. This turned out to be the worst system I’d ever used, and I have no one to blame but myself.
The battery chute was open at the bottom rear instead of the top front, right above and in front of the wing. This meant I had to remove the wing to replace the pack. In the event of a crash, the battery would have to proceed right through the upper part of the firewall, which would tear apart the entire front fuselage superstructure. There was almost no cooling air reaching the battery, except for a minimal amount coming in around the motor opening in the firewall.

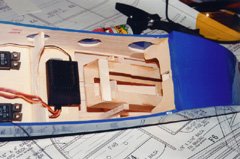
My original SlowPoke battery mount, accessible only with the wing removed. Very inconvenient, poor cooling, and bad in a crash.
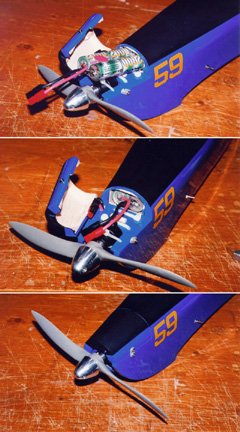
I found myself taking this plane to fun-flies, and not flying it much because it was such a pain to replace the battery. Eventually, I bit the bullet and reworked the battery mounting. I cut a hole in the upper firewall, opening up the front top of the battery chute. I closed off the rear bottom of the chute. I made a cowling to cover the space that would normally be occupied by a glow engine, and turned this into a hatch. I ran the input leads from the ESC through the motor mount and into the space under this hatch.
Now, inserting the battery is a matter of opening the cowling/hatch, sliding in the pack, hooking it up, and closing the hatch. The back of the hatch is partly open, allowing plenty of air to reach the battery, but there is enough of a lip to keep the battery from coming out when the hatch is closed. In a crash, the battery would slide out of the chute, probably damaging the hatch, but saving the rest of the plane from more serious damage.
I’ve seen other modelers’ SlowPokes with a different battery mounting method. These modelers elected to make the entire front superstructure removable (held on with hatch clips). The battery simply lays on a shelf under the hatch, held on by a piece of Velcro as long as the pack. This is convenient, and probably also good in a crash, since the battery can just peel itself off the Velcro, taking the hatch off with it.

This new battery mounting method for the SlowPoke is very much like the Fred’s Special‘s, with same conveniences and an easy escape route in the event of a sudden arrival.
F5B and F5D Planes
F5B (high performance multitask electric sailplanes) and F5D (electric pylon racers) are engineered primarily for performance. Convenience and crash survivability are secondary considerations.
To minimize drag, these models’ fuselages are as narrow as possible. To save weight, they are only as strong as they need to be to withstand flying loads (which compared to most sport planes, are quite extreme). The battery mounting methods most used can be summed up as follows: squeeze the battery into the only remaining space, and it’s guaranteed to stay put. Usually the battery goes under the wing, held there by the wing on top, the ESC and/or receiver in front, and the servos behind. Sometimes, the fit is so tight that dents actually form in the fuselage from the individual cells pressing on it from the inside.
Needless to say, installing such a battery is inconvenient. In the event of medium to severe crash, everything in front of the battery, including the electronics, motor, and fuselage front, gets damaged or destroyed. This made all the worse by the fact that these models tend to use some of the most expensive equipment there is.
Other Methods
I have seen several models where the battery is placed in the model, and then strapped down with Velcro straps or even rubber bands (think of the tie-down straps found inside most suitcases). Methods like this are often used with larger packs (20 to 36 cells).
Martin Irvine, a regular contributor to Electric Flight International, has described a method where a pack consists of cells standing up, sandwiched between two plywood plates. Two holes in the plates allow nylon bolts to pass through (the bolt passes down the gap between cells). The pack is then bolted into the model. This is reasonably convenient, and in the event of a sufficiently severe crash, the bolts will snap or shear, allowing the pack to be ejected from the model. Again, this is a method more suited to relatively large packs.
There are many other ways of mounting batteries, some of which I’ve seen, and many of which I probably have not. If you have an interesting battery mounting method, let me know so I can share it with our readers.
Related Articles
If you've found this article useful, you may also be interested in:
- Always Ready to Fly
- ARF Upgrades
- Conversion from Glow to Electric
- Scale Electric Airplane Design
- Model Airplane Electric Motor Mounting Methods
- Building and Installing Skis on Your R/C Plane

If you've found this article useful, consider leaving a donation in Stefan's memory to help support stefanv.com
Disclaimer: Although every effort has been made to ensure accuracy and reliability, the information on this web page is presented without warranty of any kind, and Stefan Vorkoetter assumes no liability for direct or consequential damages caused by its use. It is up to you, the reader, to determine the suitability of, and assume responsibility for, the use of this information. Links to Amazon.com merchandise are provided in association with Amazon.com. Links to eBay searches are provided in association with the eBay partner network.
Copyright: All materials on this web site, including the text, images, and mark-up, are Copyright © 2025 by Stefan Vorkoetter unless otherwise noted. All rights reserved. Unauthorized duplication prohibited. You may link to this site or pages within it, but you may not link directly to images on this site, and you may not copy any material from this site to another web site or other publication without express written permission. You may make copies for your own personal use.