Window Seat Bookcase Tone Cabinets for a Hammond Organ
October 15, 2009
The Hammond M-100 series of spinet organs is equipped with a 15W internal amplifier driving two 12″ speakers, and a separate 15W reverb amplifier driving an 8″ speaker. My own 1962 Hammond M-111 is missing the reverb amp and speaker. The amp was not working, and rather than repair it, I removed it and its speaker to make room for a rotary speaker powered by the main amp through a passive crossover. This gave me a Leslie-like sound, but still with only 15W total output power.
Of course, 15W from 1962 is 15 real Watts, so it’s fairly loud, but it doesn’t really fill the room the way I’d like. Furthermore, the bass response is not all that good. The usual solution to this is to add one or more external tone cabinets such as a Hammond PR-20 or PR-40, or one of the many Leslie rotary speaker cabinets. Finding one of these in good working order, good physical condition, and at a reasonable price can be quite challenging. Since I’m a DIY-er at heart, and the room that the organ is in was newly renovated but still in need of some built-in furniture, I decided to combine the two projects, producing a wall-to-wall window-seat bookcase with two integrated tone cabinets.
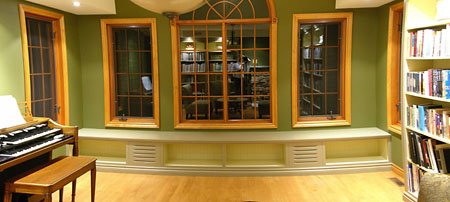
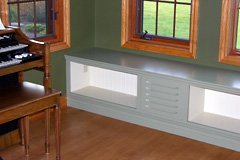
Completed window seat bookcase with integrated tone cabinets, awaiting books. You can get a feel for the rest of the room by looking at the reflections in the windows. Fisheye view created with AutoStitch.
Around the same time, I’d been reading the articles on Colin Pykett’s excellent web site, including The Electronic Reproduction of Very Low Frequencies, which discusses the issues involved in getting good bass response out of a speaker system (for electronic organs). That article, together with some correspondence with Dr. Pykett, was instrumental (pun intended) in the design of this project.
Electronic Design
Just adding more speakers to an organ isn’t going to make it any louder, since the built-in amplifier is the limiting factor. This means that an external amplifier is required, and its input must be connected to a compatible signal from the organ.
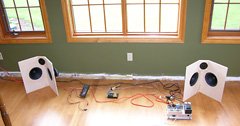
Preliminary test hookup before construction of the window seat was started. Amplifier is at bottom right.
Amplifier and Speakers
I had already used the rotary speaker from a defunct Yamaha BK-20B to add a Leslie-like effect to my Hammond M-111. I’d also used the Yamaha’s percussion sound generator and some switches as part of a drum machine project, so it made sense to use yet another Yamaha part, the 30W main amplifier, to drive the new speakers.
The Yamaha amp is designed to deliver 30W into an 8Ω load, which in the BK-20B consists of two 12″ 16Ω speakers wired in parallel (along with a passively-filtered 8″ 8Ω speaker to provide additional high frequency output). I could have used the Yamaha’s speakers, but the extra 8″ speaker would not have fit well into the window seat. Instead I decided to use four Pioneer B20FU20-51FW 8″ 8Ω full-range drivers, augmented by a pair of Pioneer ADD64-56F 3/4″ 8Ω dome tweeters. I purchased these from Q-Components, a Canadian supplier of speaker components that happens to be located just a few blocks from where I work.
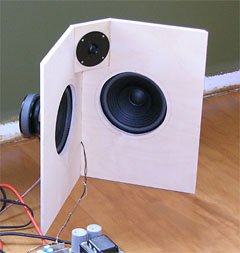
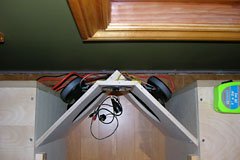
Two 8" 8Ω full-range drivers mounted at right angles are equivalent to a 12" 16Ω driver. An added tweeter (top) improves high-frequency response.
The 8″ drivers were wired in a series-parallel arrangement, thus still presenting an 8Ω load to the amplifier. Each pair was wired in series, and the two pairs were wired in parallel. A tweeter was wired in parallel with one driver of each pair, with a 4μF series capacitor to keep the low frequencies out of the tweeter (giving a 3dB drop at 5kHz, and an additional 6dB per octave below that).
After some correspondence with Dr. Pykett as to whether it made acoustical sense, I decided to mount the two drivers of each pair at right angles to one another, producing the effect of a single 12″ driver (two 8″ drivers have approximately the surface area of one 12″ driver).
Interfacing to the Organ
To preserve the warm “tube-sound” of the Hammond organ despite the use of a solid-state amplifier for the new speakers, I decided to take the audio signal from the Hammond’s internal speakers. This way, the external amplifier exactly reproduces the quality of sound coming from the organ.
I had recently added a drum machine to my M-111, which until now, had been piped through the Hammond’s external input. This had the dual disadvantges of muted cymbal and snare sounds due to the intentionally poor high-frequency response of the organ’s amplifier, and the fact that the percussion sounds played through the rotary speaker when it was in use. With the addition of an external amplifier and speakers, I would be able to play the drum unit’s output solely through them. This solves both problems and, by moving the percussion sounds outside the organ as they would be with a live drummer, gives a more realistic effect.
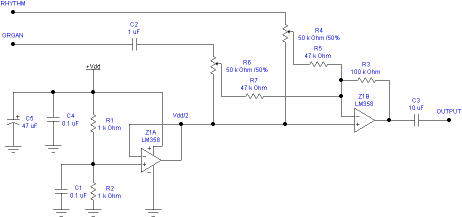
Combination attentuator, mixer, and pre-amp to match organ and drum machine signals to the external amplifier.
To accomodate these two sound sources (the organ itself and the drum machine), I built a small mixer and pre-amplifier to feed the external amplifier. Adjustable attenuation on the mixer inputs allows it to handle both the line level signal from the drum machine, and the “hot” signal directly from the speakers. As is my practice for one-of-a-kind projects these days, I built it using stripboad instead of designing a printed circuit board.

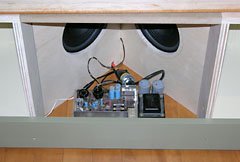
The two boards at the top left are the mixer/pre-amp and power supply. The two large boards are part of the drum machine.
The mixer/pre-amp is powered by a separate 12VDC power supply with its own transformer, isolated from the organ’s circuitry. This is the same power supply that powers the drum machine, and is described in that article.
The pre-amp and external amplifier are connected by a pair of shielded audio cables. One connects the pre-amp’s output to the the amp’s input, while the other provides 12VDC to activate a relay installed inside the amp. This relay controls the 110VAC power to the amplifier, turning it on only when the organ is on.
To keep things neat, I installed a wall plate with two RCA jacks on the wall behind the organ and ran shielded cable down the inside of the wall, then below the drywall and behind the baseboard from the organ to the bookcase. Short cables are used to connect the organ to the wall jacks.
Physical and Acoustic Design
My Hammond M-111 is in our library, a room with built-in bookcases on two walls and windows along most of the third wall. There was a large empty space remaining in front of the windows that was calling out for a window seat to provide a place to sit and read while also providing more book storage space. With a total length of 14 feet, there was plenty of room to integrate two speaker sections between the shelves.
One key piece of information from the previously mentioned article by Colin Pykett was that the reproduction of low frequency sounds like those produced by a 16′ organ pipe requires a speaker enclosure of comparable size. Since a typical bookshelf is only about 12″ deep but a typical seat is about 18″ deep, I was able to design the bookcase so that a 14′ × 6″ × 18″ space behind the shelves (just over 10 cubic feet) became the resonant cavity of the speaker system.
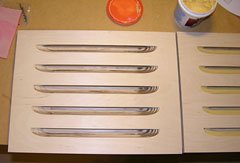
The next issue to solve was how to face the front of each speaker section. We did not want to spoil the look of the bookcases by using speaker grille cloth. I eventually decided to use plywood panels with Leslie speaker louvres cut in them, which lead to a lot of head scratching about how to make them. I found a few web sites that showed how, but only one method resulted in authentic looking louvres, and it required making a custom blade for a circular saw.
Eventually I found Valhalla Woodworking, which specializes in making reproduction Hammond and Leslie enclosures. I contacted owner Byron Coy and ordered a pair of custom cut louvred panels for a very reasonable price. I was very impressed by the quality of the panels when they arrived, and Byron even threw in the almost-perfect test panel he’d made before cutting the real ones. Everything was made precisely according to the drawing I’d e-mailed, and was completed earlier than promised.
Each driver pair assembly came to a width of 18″, leaving 11′ for the bookshelves and supports between them. I built four (almost) identical shelf units out of 3/4″ birch-veneer plywood and various pieces of plywood and MDF left over from earlier projects. The back of each unit was faced with bead-board matching the other boookcases in the library.
The leftmost unit differed from all the rest in three respects:
- The back was made with a large cut-out, and the bead-board facing made removable, to allow access to an electrical outlet behind the bookcase. This outlet was needed to supply power to the speaker amplifier. There were several other outlets as well, but they were disconnected at the source so that they would not need to remain accessible.
-
A cut-out was made in the left side to allow installation of an extender to bring another existing electrical outlet into the bookcase. This outlet needed to be kept live because it supplied power to the previously mentioned outlet, and thus had to remain accessible.
-
Baffles were constructed underneath the shelf to redirect air from a forced air heating/cooling register underneath the bookcase into the left speaker enclosure, from which it could flow into the room.
Because the left side speaker enclosure would be doing double duty as a heating register, I did not think it wise to put the amplifier there, even though it would have been closer to the organ and electrical outlet. So, the amplifier was placed in the right side speaker enclosure, in front of the dual-driver assembly. Power was obtained through a heavy-duty extension cord plugged into the electrical outlet behind the leftmost bookcase.
I won’t go into all the details of the cabinet construction here, since this is a Hammond organ article, not one about furniture making. The only difference from typical custom cabinets made off-site is that the face frames were added after the cabinets were installed, so there are no visible joints between the units. Like the other bookcases in the room, the base of this bookcase was trimmed with the same baseboard used throughout the room, painted to match the bookcase.
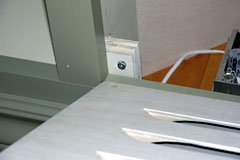
The one remaining problem to solve was how to fasten the louvres into the openings left for them. The solution was simple: wooden blocks glued inside the enclosures, screws in the blocks for depth adjustment, and small rare-earth magnets embedded in the backs of the panels. Installing a panel is then just a matter of setting it in place, where it magically stays.
Testing and Adjustments
Once everything was completed, I turned on the organ, pulled out the 8′ drawbar, set the expression pedal about half way, and played a middle C. I measured the AC RMS voltage across the organ’s internal speakers and then adjusted the pre-amp’s ORGAN input attenuator to achieve the same voltage across the external speakers. That way, the internal and external speakers will produce approximately the same power, and I can be sure that playing the organ at full volume will not overdrive the Yamaha amplifier. I then turned the drum machine to full volume and adjusted the RHYTHM input attenuator to achieve a good balance between the organ tones and percussion sounds.
The Results
I was very happy with the way the whole project turned out on all levels: furniture, electronics, and the resulting sound.
Because of the location of this new bookcase, I can now keep my music books right next to the organ. I still have to get off the bench, but I no longer have to walk across the room.
The organ’s sound literally fills the room now, since it isn’t coming from a single point. And, using the external speakers together with the internal rotary speaker gives an even fuller 3D effect.
I’m also pleased with the result of feeding the drum machine output through only the external speakers, since the rhythm section is now realistically off to one side instead of in front of my knees. The cymbal and snare sounds are also much brighter since they no longer pass through the Hammond amp.
Related Articles
If you've found this article useful, you may also be interested in:
- Rebuilding a Hammond AO-29 Amplifier from the Ground Up
- Hammond Organ Tonewheel Generator Capacitor Replacement and Calibration
- Overhauling the AO-29 Amplifier in the Hammond M-100 Series
- Retronome – A Versatile Analog Drum Machine for My Hammond Organ
- Overhauling and Improving the Hammond M-100 Series Vibrato System
- Adding a Rotary Speaker to a Hammond M-111 Organ

If you've found this article useful, consider leaving a donation in Stefan's memory to help support stefanv.com
Disclaimer: Although every effort has been made to ensure accuracy and reliability, the information on this web page is presented without warranty of any kind, and Stefan Vorkoetter assumes no liability for direct or consequential damages caused by its use. It is up to you, the reader, to determine the suitability of, and assume responsibility for, the use of this information. Links to Amazon.com merchandise are provided in association with Amazon.com. Links to eBay searches are provided in association with the eBay partner network.
Copyright: All materials on this web site, including the text, images, and mark-up, are Copyright © 2025 by Stefan Vorkoetter unless otherwise noted. All rights reserved. Unauthorized duplication prohibited. You may link to this site or pages within it, but you may not link directly to images on this site, and you may not copy any material from this site to another web site or other publication without express written permission. You may make copies for your own personal use.
Brendon Wright
October 21, 2009
Wahoooo!!!
I WANT ONE!!!
That’s really brilliant, Stefan.
-B
Arden
December 26, 2009
Wow!! The process you used to determine the "right" sound was excellent, and the construction is perfect!
Thanks for sharing your work.