A Riff on a Russian Navigator’s Watch
July 28, 2013
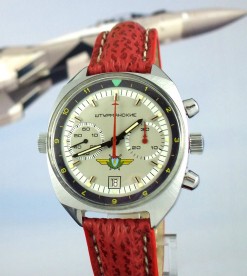
There are dozens, if not hundreds, of different chronograph watches based on the 3133 manual winding movement by Poljot (Полет, meaning “The Flight”, in honour of the first manned space flight). I have acquired a few of these, my first being a modern day Russian-made Strela (Стрела, meaning “Arrow”) and its derivatives. However, one that caught my eye early on was the Soviet-era Sturmanskie (Штурманские, meaning “Navigator’s”), as it was intended as a pilot’s watch, and there was something about the colour scheme that I found appealing.
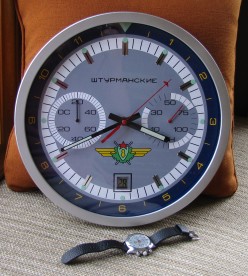
I eventually found a used Sturmanskie that suited my budget (a newer model without the blue chapter ring), but long before that happened, I decided to make a wall clock based on the Sturmanskie design.
Ingredients
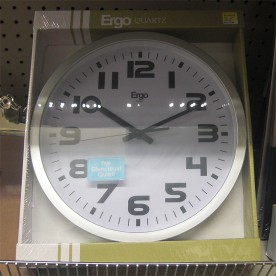
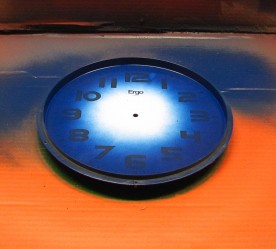
To make a wall clock, start with a wall clock. I considered just buying a movement and building the entire clock from scratch, but since I was aiming for a plain round design, I opted to buy an inexpensive clock instead. This automatically provided a case, bezel, glass, hands, and movement. Serendipitously, the movement that it came with was a continuous sweep one, meaning that the second hand wouldn’t have that once-per-second quartz motion, but would approximate the six-times-per-second motion of the real thing.
The Sturmanskie watch is a chronograph, meaning that in addition to telling the time, it also has a built-in stop watch. In fact, the hand that would be the seconds hand on an ordinary watch is the stop watch seconds hand; the actual seconds hand is on the small subdial at the 9 o’clock position. I originally planned to use a second clock movement to drive a separate seconds hand, but decided instead to build the clock with a traditional central seconds hand.
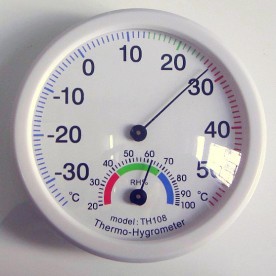
In order to make the subdials functional and not just decorative (such as those on cheap chronograph lookalikes found at dollar stores and flea markets), I decided I’d turn them into a thermometer and hygrometer respectively. I purchased an inexpensive thermometer/hygrometer combo from a seller on eBay for the necessary parts.
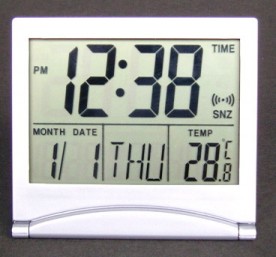
Another feature of the Sturmanskie watch (and most other 3133-powered chronographs) is the date window. To the best of my knowledge, there are no clock movements available that have a date wheel. After some thought, I came up with the idea of using an inexpensive LCD travel clock to show the date. Again, eBay to the rescue. I sifted through a number of candidates until I found one that had date digits of about the right size, and in the right location so that the entire unit would fit behind the clock face.
Preparing the Clock
The first thing to do was to disassemble the purchased clock. This included removing the bezel, glass, and movement. I left the dial in place, as it was just a glued-in printed sheet, and would be completely covered by the new dial.
The original Sturmanskie watch has a bevelled chapter ring surrounding the dial, but I chose to have a flat ring, printed as part of the new dial. This left only the inside edge of the case to worry about. I found a dark blue spray paint that was a good match for the chapter ring, and used that to colour the inside edge.
The holes for the thermometer, hygrometer, and date display were all made with a 1″ diameter drill, using the artwork as a guide to locating the exact centre for each hole. The thermometer and hygrometer would later be fastened directly to the back of the artwork. The date display would be attached to the case, with the rectangular cut-out in the artwork covering the round hole, allowing only the date digits to show through.
Making the Dial
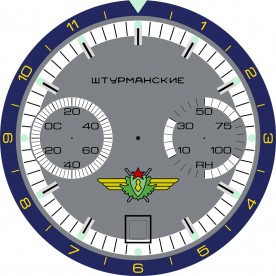
I produced the artwork for the new dial in Adobe® Photoshop® Elements, an entry-level but very full featured photo editing program. Normally, one would use a program intended for illustration (such as Adobe Illustrator), but Photoshop is what I had on hand. By making use of the layer duplication and rotation features, it was relatively straightforward, if somewhat tedious, to produce a geometrically accurate dial (i.e., not just “eye-balled”).
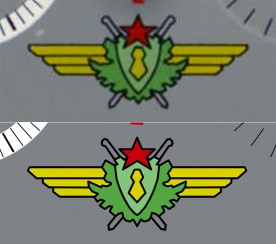
To produce the “wings” emblem, I started with an enlarged image of the best quality photo of a Sturmanskie watch that I could find. I then used Photoshop’s line drawing features to manually trace over the left half of the image. Once that was done, I made a mirrored copy, joined them together, and then used the “paint can” tool to fill in the colours.
The “Штурманские” caption proved a bit more of a challenge. I was unable to find a Unicode font that looked the same as the one used on the watch, so I eventually resorted to working from an enlarged photo. To make it look presentable at a large size, I had to do a lot of manual editing.
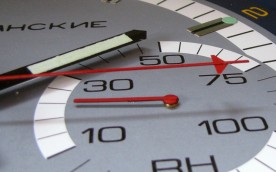
Since I would be using the subdials to indicate temperature and humidity, I had to determine the correlation between the original dial markings, and the movement of the thermometer and hygrometer needles. I did this by overlaying scans of the instrument dials on the clock dial artwork. It turned out that the thermometer mapped almost perfectly onto the seconds dial, with each second corresponding to 2°C. The hygrometer was a bit less linear, but I was still able to achieve a reasonable correspondence (metal-paper spring hygrometers aren’t all that accurate anyway).
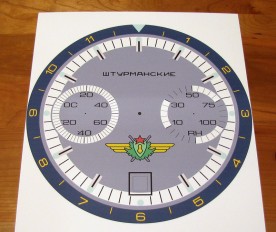
I printed the completed artwork on a sheet of 11″x17″ cover stock, using an HP OfficeJet 7500A printer. Fortunately, this printer is capable of printing right to the edge of the paper, as the artwork was 10.95″ wide.
Once printed, I cut out the dial and installed it in the clock. To ensure proper alignment, I temporarily installed the movement (held with tape instead of its mounting nut). I applied 3M “77” spray adhesive generously to the back of the printed dial, and then carefully lowered it into position.
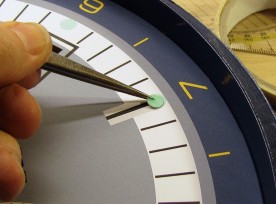
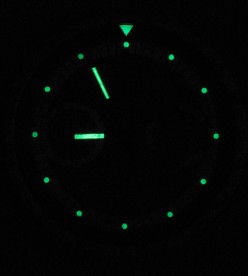
A real Sturmanskie watch has applied indices and lume dots, not flat printed ones, and this clock would be no exception. I made the lume dots by printing a band of light green (the same shade used in the artwork) on a piece of cardstock, and then painting several coats of Ultra Green V10 water-based luminescent paint from Glow Inc. over it. Although not advertised as such, this paint is based on the same Europium-doped Silicate-Aluminate Oxide pigment as the SuperLuminova paint used by high end watchmakers. Once the paint was dry, I applied double-sided tape to the back of the card stock and used an office hole punch to cut out the dots. The lume triangle at 12 o’clock was made in a similar way.
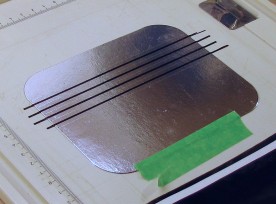
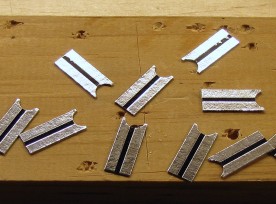
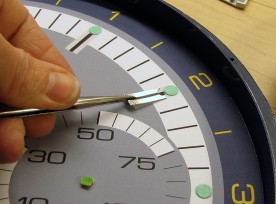
The indices were made from a piece of metallized cardboard that came as packaging for something from the grocery store. The black line down the centre of each index was made with black self-adhesive Monokote® model airplane trim film. I laid down several strips of the trim onto the cardboard and then cut it into strips of the appropriate width. I then cut each strip into pieces of the right length, and used the hole punch to notch the ends to fit around the lume dots. Once again, double-sided tape was used on the backs of the indices to hold them to the clock dial.
Once the dial was complete, I gave the whole thing several light coats of non-yellowing satin spray enamel to protect the printing, and to seal the edges of the applied markers.
Hands
The hour and minute hands provided with the donor clock were almost exactly the right size. I trimmed the ends slightly to give them a bit of a point.
To apply the lume, I first masked off the parts of the hands that were not to be lumed, and then spray painted the exposed areas white. I then applied several coats of luminescent paint before removing the masking tape.
A Sturmanskie second hand is usually red and has a small arrow or wing near the tip. To achieve this effect, I cut a small triangle out of card stock and glued it to the back of the supplied second hand. I then spray painted the whole hand red.
The thermometer and hygrometer already had hands, but of two different sizes, both of which were far too small. My wife came up with the brilliant idea of gluing on pieces cut from the straight side of a bobby pin to make them longer, thicker, and of the same length. Like the second hand, I painted the hygrometer hand red. These two hands are red on the real watch because they are the chronograph hands.
Assembly
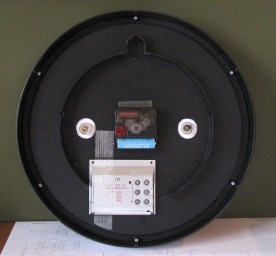
I found it impossible to separate the thermometer and hygrometer from their original dial, so I simply cut out the piece of dial containing each instrument. This was then fastened to the back of the artwork with double-sided tape within the oversized hole that I’d drilled in the clock case.
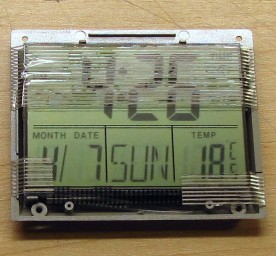
The calendar proved a bit more challenging. The travel alarm had a fairly thick bezel, which set the calendar too far back from the clock dial. Depending on the viewing angle, the digits would sometimes be obscured by the artwork. I found that I could disassemble the calendar to get rid of the bezel. Since I would not be using any feature other than the date, I used filament tape to hold the remaining bits together, and more tape to hold it to the back of the clock.
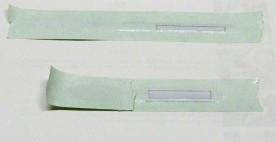
Because of the size of the travel clock, and the location of the calendar display on its screen, I had to cut away part of a stiffening ring on the back of the clock case to position the calendar correctly. I also wrote detailed setting instructions on the back, since resetting the calendar after a battery change would have to be done without being able to see the entire screen.
Conclusion
I built this clock early on in my watch collecting days, because I liked the looks of the Штурманские watch, but couldn’t justify buying one at the time. The colour scheme is bright and cheerful, yet not over the top, and lends itself well to a wall clock. And although a wall chronograph is not very useful, the chronograph style works well as a clock-thermometer-hygrometer combination.
Related Articles
If you've found this article useful, you may also be interested in:
- Building a Musical Sunrise Quartz Alarm Clock
- Making Custom Watch Dials
- Why Negative LCDs Are So Hard to Read
- Turn a NATO Strap into a Two Piece Watch Strap
- Restoring a Mechanical Russian Alarm Watch
- Repairing a Scratched Acrylic Watch Crystal

If you've found this article useful, consider leaving a donation in Stefan's memory to help support stefanv.com
Disclaimer: Although every effort has been made to ensure accuracy and reliability, the information on this web page is presented without warranty of any kind, and Stefan Vorkoetter assumes no liability for direct or consequential damages caused by its use. It is up to you, the reader, to determine the suitability of, and assume responsibility for, the use of this information. Links to Amazon.com merchandise are provided in association with Amazon.com. Links to eBay searches are provided in association with the eBay partner network.
Copyright: All materials on this web site, including the text, images, and mark-up, are Copyright © 2025 by Stefan Vorkoetter unless otherwise noted. All rights reserved. Unauthorized duplication prohibited. You may link to this site or pages within it, but you may not link directly to images on this site, and you may not copy any material from this site to another web site or other publication without express written permission. You may make copies for your own personal use.
Avinash Lewis
July 28, 2013
Wonderfully made, Brilliant effort!, I have that ebay travel clock since many years..
schnurrp
July 28, 2013
Well done! Good idea to use the sub dials as you did. You are quite a craftsman, keep up the good work.
Soeren Poulsen Denmark
July 27, 2014
You are crazy! But Your work looks so neat and fine. Well-done.
Regards Soeren Poulsen
Gabi
August 14, 2014
Great work! Shturmanskie is better translated as “helmsman” according to a friend of mine that speaks russian.
Eugen
October 10, 2014
Great work!