ARF Upgrades
September 1, 2003 for QuietFlyer Magazine
Almost-Ready-to-Fly (ARF) models have really taken over this hobby. It seems that the majority of new model announcements are ARFs. New kits are becoming a relative rarity. In one way, this is a shame, because modern kit production technology (CAD-drawn plans and laser cut parts) have made kits easier to build than ever. Unfortunately, people are leading busier and busier lives, spending more time at work (perhaps designing, building, and selling things like CAD systems and laser cutting machines) and in other non-modeling activities.
Fortunately, the increased demand for ARFs has resulted in stiff competition, and a general increase in ARF quality to higher than that achieved by the average modeler. Early ARFs featured sloppy construction and poorly applied finishes, but this is mostly behind us. However, this does not mean that there is no room for improvement.

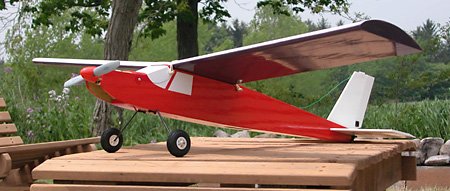
The dark-colored wing underside makes it easy to tell from a distance which way is up, even when the model is inverted.
When you consider that you can purchase an ARF for less than the combined cost of a kit, glue, covering materials, and miscellaneous hardware, it becomes apparent that the manufacturer has to make some concessions in order to be able to pay someone to construct the model, and still turn a profit. There are many facets of ARF construction and finishing that are the way they are purely to lower costs.
Finally, one problem with an ARF model, especially a popular one, is that yours will exactly the same as everyone else’s. At a busy flying field, flying more two or more identical looking planes at once is asking for trouble.
Improve and Customize
There are several areas in which you can make improvements to an ARF model which will set it apart from others of its kind, both in appearance, and in performance. Many of these improvements are easy to carry out, whereas some are more time consuming. Taken together, they might be as time consuming as building a whole model from scratch. Of course with an ARF, you’ll have a flyable model at almost every step of the way.
Appearance
There’s a lot that can be done to improve a model’s appearance. At first, this may seem to be of little importance, but appearance changes have two benefits in addition to just making the model look better: they make it easier to distinguish from other similar models in the air, and they can make it easier to fly.
I’m no artist, so I won’t say much about improving appearance for appearances’ sake, other than that I find that one or more stripes can go a long way. Take a look at some of the self-adhesive striping tapes available at your nearest auto parts store, and use your imagination. Several hobby manufacturers make decorative decals for models as well.
More significant changes in appearance can be made with paint, or by re-covering parts of the model. The latter can be a lot of work, and might require tools you don’t have if you only fly ARF models.
Topflite makes a line of paints intended for painting Monokote. These work on other film coverings too. I’ve also find that Krylon or Mastercraft Fast Drying spray paints work well on film covering as long as you thoroughly clean it, and then scuff the surface with very fine steel wool.
Almost every ARF model I’ve had experience with has had the wing covered in a single color both top and bottom (often white). This goes against one of the most well known rules of thumb for model color schemes: the bottom of the wing should be dark, and the top light. A wing that is the same on the top and bottom looks the same whether it’s upright or inverted. In certain lighting conditions, such as just before sunset, a light underside can even cause the wing to disappear completely against the sky.
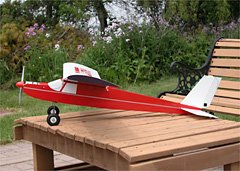
After losing orientation of my SL Models Tiny ARF several times, I finally painted the underside of the wing a dark purple color (purple only because I had purple Krylon on hand, and it didn’t clash too badly with the red fuselage). This has made the model much easier to fly.

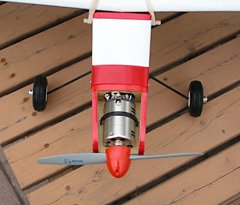
Switching to a Kyosho Magnetic Mayhem gave a 14% power increase, at reduced current, improving both performance and flying time.
Performance
There are two main ways of increasing the performance of a model: more power and less weight. Performance potential is largely determined by the power-to-weight ratio. Increasing the power or reducing the weight increases this ratio. If you can achieve both, all the better.
More Power
Some ARFs come with a power system (sometimes already installed), and others come with a recommendation for what to use. More often than not, the provided or recommended system is a low-cost one. Manufacturers are afraid to scare off potential buyers with a requirement for a system costing hundreds of dollars on top of what they’ve already paid for the model. However, there are many mid-priced systems that will easily outperform the low-cost one provided or recommended.
For example, the motor recommended by SL Models for the Tiny is a Graupner Speed 600 7.2V, turning a 7×4 propeller, on 6 to 8 cells. With 6 cells, this will actually fly the model (if kept light – more on that later) reasonably well, but it can be improved upon quite easily. Replacing the motor with a Kyosho Magnetic Mayhem, increases propeller rpm from 10,900 to 11,400 (a 4.5% rpm increase, which is a 14% power increase), while reducing current from 17.7 to 16.4A. This means more usable power for a longer time from the same battery. An Astroflight Cobalt 05 would do even better.
Going further up the price scale, using a brushless motor such as the Hacker B40 15L and adding one more cell, will dramatically improve performance, with no net increase in weight.
If the model allows it, installing a geared power system can yield even better results. As I’ve often discussed in the past, a gearbox allows the motor to swing a larger, more efficient propeller, while still operating at the higher rpm at which the motor is efficient.
Lose Weight Now!
Weight reduction will have a larger proportional effect on performance than a power increase. In addition to improving the power-to-weight ratio, weight reduction reduces the wing loading of the model. Less weight means less lift required, and less lift means lower induced drag. This in turn means that less power is required to keep the model at flying speed, resulting in longer flights.
There are two primary ways to reduce the model’s weight: lighten the airframe, or use lighter weight equipment (motor, battery, and radio equipment).
Lightening the airframe requires structural modifications, which are not easily done on an ARF; they would have best been done during construction.
It is possible to remove some weight by making holes in large sheeted areas (especially on ARFs with thick sheet balsa or plywood fuselage sides). This will require removing the covering, which is not that difficult to do if you have a heat gun. First loosen one corner of the covering, and then pull up on it while heating it with the heat gun. If done carefully, the covering can be removed without tearing it and leaving pieces behind.

Lightening holes should have rounded corners, stay away from the fuselage edges, and take bulkheads into account. This example is from a kit.
Once uncovered, you can cut holes in the fuselage sides. These holes should start about 1/2" behind the trailing edge. The holes should be no more than about 2" or 3" in length, separated by about 3/4". They should also remain at least 1/2" away from the fuselage edges. Finally, all the corners should be rounded, with no less than a 1/4" radius. The holes should be cut so that any bulkheads or formers coincide with the spaces between the holes.
When it’s time to re-cover the fuselage, use a relatively lightweight covering material. I like transparent Solarfilm for small models (Speed 400 sized or smaller), and transparent Monokote for larger models (the transparent colors are significantly lighter than solid colors, which in turn are lighter than metallics).
Modern ARFs tend to use fairly good, lightweight, covering materials, but some older ARFs were covered with very thick and heavy films. These would benefit from a total strip-down and re-covering with a lighter material. (Hint: to achieve a lightweight wing with a light top and a dark bottom, use white film on top, and a dark transparent color on the bottom).

Using lightweight radio equipment saved about 3 oz. Another 6 oz were saved by using a 6x1250SCR instead of a 7xRC2400 battery.
More significant weight savings can be found in equipment selection. For example, the Tiny that I recently reviewed was intended for a standard sized receiver, speed control, 6 to 8 RC2400 cells, and two standard sized servos. The model is quite heavily built, with thick fuselage sides, and a hardwood veneered foam wing (the model is intended for either electric or glow power, and thus was built strong enough for the latter). Using the recommended equipment and Speed 600 motor, would have produced a 46 oz model. This is heavy for such a small (41" span) model.
By switching to a Great Planes all-in-one Receiver/Speed Control, micro servos, and six 1250SCR cells, the finished weight came to 37.5 oz (more modern CP1700SCR cells are as small, and almost as light, but I had the 1250SCRs on hand). Removing the landing gear (only because I didn’t need it in the field I usually fly from) saved another 2.5 oz, bringing the ready-to-fly weight down to 35 oz. This is a 24% reduction from the original 46 oz. Even though I used one less cell (six 1250SCR cells instead of seven RC2400 cells), the power-to-weight ratio was higher because of the significant weight savings.
Other Modifications
In addition to improving the appearance and/or performance of a model, there are other modifications you can make. One of these, for a rudder-elevator model, is to add ailerons. For models with built-up wings, the ailerons can often simply be cut out of the trailing edge material, bevelled, and then top-hinged with covering material or tape (after covering the balsa that was exposed when the ailerons were cut out).
Similar techniques can be used on sheeted foam wings, although the exposed foam might need to be scraped out a bit, and some wood installed to form a rear spar (to attach the aileron to), and an aileron leading edge.
For an unsheeted foam wing, the easiest thing to do is cut out a space for a piece of trailing edge stock, glue that in place of the removed foam, and then proceed as for a built-up wing.
Installing aileron pushrods in an already built wing can be troublesome. It’s generally easier to use a separate servo for each aileron, and just worry about threading the servo leads through the wing. When working with a built-up wing, it will be easier if you remove the covering first (if you are planning on re-covering it anyway). Because each servo is operating only one aileron, you can use smaller servos than the ones operating the rudder and elevator.
Another possible modification, if your model’s wings are held on with rubber bands, is to make a bolt-on wing. I’ll describe the benefits of that in more detail next month, when I talk about a different meaing of ARF: Always Ready to Fly.

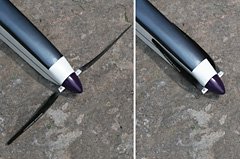
A folding propeller is probably one of the most important changes you can make to an electric sailplane ARF to improve glide performance.
Sailplanes
All of the upgrades discussed so far apply to electric sailplane ARFs as well. Lighter is better. So is more power. One additional improvement is to use a folding propeller, and a speed control with a brake. That way, when you turn off the motor at altitude, the propeller will stop and fold back neatly against the fuselage sides. This greatly reduces drag, and thus improves glide performance (a free-wheeling propeller produces more drag than a disk of the same diameter).
Be Unique
Even with an ARF, you don’t have to give in to that "one-of-the-crowd" feeling, or suffer with a poorly performing model. There is much that can be done to end up with a model that is uniquely yours!
Related Articles
If you've found this article useful, you may also be interested in:
- Always Ready to Fly
- Conversion from Glow to Electric
- Scale Electric Airplane Design
- Model Airplane Electric Motor Mounting Methods
- Building and Installing Skis on Your R/C Plane
- Electric Aircraft Battery Mounting Methods

If you've found this article useful, consider leaving a donation in Stefan's memory to help support stefanv.com
Disclaimer: Although every effort has been made to ensure accuracy and reliability, the information on this web page is presented without warranty of any kind, and Stefan Vorkoetter assumes no liability for direct or consequential damages caused by its use. It is up to you, the reader, to determine the suitability of, and assume responsibility for, the use of this information. Links to Amazon.com merchandise are provided in association with Amazon.com. Links to eBay searches are provided in association with the eBay partner network.
Copyright: All materials on this web site, including the text, images, and mark-up, are Copyright © 2025 by Stefan Vorkoetter unless otherwise noted. All rights reserved. Unauthorized duplication prohibited. You may link to this site or pages within it, but you may not link directly to images on this site, and you may not copy any material from this site to another web site or other publication without express written permission. You may make copies for your own personal use.
