GravelMaster – A Cheap Tough Speed 400 Fun Plane
September 1, 1999
Last summer (1998), I built a Speed 400 powered 3/4-scale version of the Ace PuddleMaster. You can read about that in the article I wrote about it. Shortly after that, I wanted a plane that I could fly at work. Unfortunately, my “flying field” at work was a large empty gravel lot, so I wanted something tough and resilient, like Pat Mattes’ Push-E Cat.
Being one to do my own thing, I set out to design my own. I knew I wanted a foam wing, and a pylon mounted motor, so I decided I’d just share the wing that I already had for the PuddleMaster. That way, I only needed to design and build half a plane. To further simplify matters, I decided to use the same flying surface geometry.
So, I put a piece of tracing paper over the PuddleMaster plan (which Ace so thoughtfully printed 3/4 of full-size), placed my radio gear and motor battery on it, and designed the smallest plane I could around it. What I ended up with looks a lot like a PuddleMaster at first glance (not surprising), but is actually quite a bit sleeker (it has about 1/3 the fuselage cross-sectional area).
Note: I do not have a plan available for this plane. What I have is a rough sketch made over PuddleMaster plans, and the plane has too much in common with the PuddleMaster for me to feel comfortable publishing a plan for it. So, this is not a construction article. It’s just an informative, and hopefully interesting, account of this plane I built.
Specifications
- Wing span: 36 in (914 mm)
- Wing area: 216 sq.in (13.9 dm2)
- Weight: 20.4 oz (580g)
- Wing loading: 13.6 oz/sq.ft (41.7 g/dm2)
- Motor: Speed 400 6V
- Battery: 7x600AE
- ESC: My design, with BEC
- Prop: Master Airscrew 5.5×4
- Servos: Two standard size (Hobbico)
The wing is an Ace constant chord foam wing (which I’ve heard has become impossible to get; what a shame). The fuselage is built up from 1/16″ (1.5mm) sheet balsa. The radio gear (full-size to save money) is in the nose, and the motor battery (7x600AE) is under the wing. The speed control is also under the wing.
Construction
As I said earlier, this is not a construction article. What follows are just some photos and comments related to the construction.
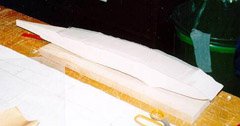
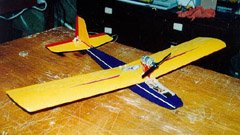
In the first photo, we have the nearly completed fuselage resting on the rough plan I drew. The sides are 1/16″ (1.5mm) balsa. There are 1/16″ (1.5mm) vertical grain doublers under the wing. Top (incomplete here) and bottom sheeting are 1/16″ (1.5mm), cross grain.
The next photo is a top view of the fuselage in the same stage of assembly. You can see the cross members for the servos just in front of the wing leading edge former, and the 1/8″ (3mm) ply wing hold down plate (not yet drilled) in front of the trailing edge former. The formers are all made of 1/2″ (13mm) wide 3/32″ (2.5mm) balsa strip, formed into rectangles. The only exception is top cross member of the wing leading edge former, which is made of 3/32″ (2.5mm) ply, drilled to except the front wing dowel. You can see drawings of the formers on the plan in the previous photo.
In the next photo, the fuselage bottom is about to be covered in 3/4 oz/sq.yd (25 g/m2) glass cloth, applied with water-based polyurethane. This was my first time using this technique, and I was really impressed by how easy and odourless it was, and by the resulting finish. The basic idea is to apply the cloth (with a light misting of 3M 77 adhesive on the back of the cloth only), and then apply a coat of the polyurethane. When dry, sand it until you get down to the cloth. Apply another coat and sand again. Do this repeatedly until the weave is filled. It adds very little weight, and results in a tough, smooth, finish.
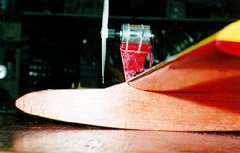
The fuselage sides were covered in silkspan, also applied with the polyurethane. To impart some colour to the finish, red and yellow liquid food colouring was added to the finish. You can see the resulting orange colour, with the wood grain still showing through, in the photo. Also visible is the small amount of clearance between the propeller and the fuselage.
The radio equipment is all in the nose. Without a motor in the nose, this is necessary to get the centre of gravity into the right place. You can see the R/C gear in the following photo. For a canopy, I used some clear butyrate sheet, cut to the appropriate shape, scored where the fuselage starts to slope upward, and held on with 1/8″ (3mm) wide strips of double-sided carpet tape. The front of the canopy is tucked under the small amount of top sheeting immediately behind the nose block. A strip of clear tape helps to hold it down at the front. Also visible below is the motor battery, which goes immediately behind the wing leading edge (the wing must be removed to replace the battery). As you can see, everything is a very tight fit up front.
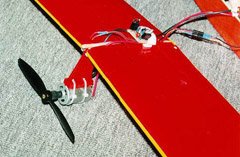
This next photo shows the speed control, attached to the bottom surface of the wing using double-sided foam servo tape. The speed control is connected to the battery by a Deans Ultra Plug (also visible above). The speed control is connected to the receiver by a regular three-pin Deans plug. The motor wires pass through the wing on either side of the pylon (the pylon is part of a 1/8″ (3mm) ply wing root half-rib). The arming/power switch wires also pass through the wing, and the arming switch is glued onto the top surface of the wing. The motor is sits in a saddle on the top of the pylon and is held in place with plastic cable ties.
The wing is covered with Solarfilm, transparent red on the bottom, and opaque yellow on top (the tail surfaces are too). Applying Solarfilm to solid surfaces is very easy. You just iron it on; no pulling, stretching, and shrinking to do.
The Model
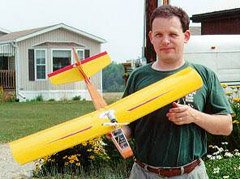
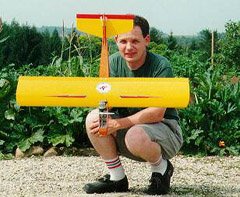
The following photo shows the completed model, ready for its first flight. That’s me holding it. The lightning bolts on the wings are from a $10 styrofoam glider I’d bought (the foam wings looked promising). In the photo, it’s got a 5×4 Tornado prop, but I never could get the thing to balance.
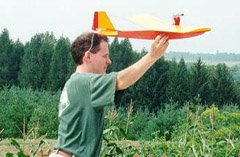
Next, it’s about to be launched. Well, actually not. I haven’t got my transmitter, and I’m throwing it straight towards my kitchen window. But it looks good.
Flying
I don’t have any in-flight photos. I tried to take a few, but my camera’s zoom lens just isn’t good enough. The plane just ends up being a spec.
During the first few flights, I used a Master Airscrew 6×3 prop, which only gave about 1/8″ (3mm) clearance between the prop and the canopy. But, the plane flew just fine, although the canopy tended to buzz.
After a few test flights at home, I took the plane to work, and flew it there. Well, gravel is a lot tougher than I thought. The first landing tore up the bottom pretty badly, and cracked the bottom edge joints. The following day, a construction company started building on that vacant gravel lot. These two facts combined to put an end to flying in a gravel field.
After some repairs, I took the plane with me to KRC, where I landed it on a paved runway. This did less damage than the gravel, but it still scratched up the bottom quite badly. One good thing that came out of the KRC trip (with respect to this plane) is that I bought some 5.5×4 Master Airscrew props there, and tried one out. What a difference! The plane accelerates much more quickly, and has become a lot hotter. Consecutive loops from a slight dive are no problem, and I can even roll it (has anyone ever rolled a PuddleMaster?). The GravelMaster will easily maintain altitude, with neutral elevator, at half throttle.
After returning from KRC, I refinished the bottom one more time, and decided I’d like a more striking colour scheme. I didn’t want to change the wing (since it’s also used on my PuddleMaster), so I also left the tail the same. But I painted the fuselage with navy blue fast-drying enamel (Canadian Tire brand, but it seems to be identical to Krylon). I then added a white accent stripe (also from Canadian Tire).
My Favourite Plane
What started out as a quick’n’dirty project to build a toss-around plane to fly at work has turned into my favourite plane (most of the time). My regular flying field (a hay field that we rent to a local farmer) was unflyable this year (because the farmer planted grain for a year to replenish the soil), but I found that the GravelMaster could withstand landing in the field (no covered open structures to poke holes through). So I ended up flying it a lot, since it was easier than driving down the road to use a neighbour’s hay field to fly my other planes.
Also, I never felt I had much of an investment in time, money, or emotion in this plane, so I started doing things I’d never done before, like low passes, and stall turns 50ft (15m) off the deck. As a result, I’ve pushed the envelope more than I would have if I’d been flying my other planes. The fact that this plane is pretty tough also helps me worry less about making mistakes.
Recently, I took the GravelMaster out in the snow. With the pylon mounted motor, and pushrods above the horizontal stabilizer, the bottom of the fuselage is basically one long ski. I gave it full throttle and it was off in about 50ft (15m). After flying around for about 5 minutes, my fingers were getting cold, so I landed. The GravelMaster came to rest about 50ft (15m) from where I was standing, so I taxied it back. The prop blast over the rudder is very effective for steering on the ground.
This thing is just plane fun!
Related Articles
If you've found this article useful, you may also be interested in:
- Sig LT-25 Twin Electric Conversion
- Flit! A Speed 280 Four Channel Aerobat
- Electrifying the Great Planes SlowPoke
- Trials and Tribulations of an Ace Pacer Electric Conversion
- Sig Riser 100 Electric Conversion
- A Speed 400 PuddleMaster Flying Boat
- Spectra-V: A Modified Great Planes Spectra

If you've found this article useful, consider leaving a donation in Stefan's memory to help support stefanv.com
Disclaimer: Although every effort has been made to ensure accuracy and reliability, the information on this web page is presented without warranty of any kind, and Stefan Vorkoetter assumes no liability for direct or consequential damages caused by its use. It is up to you, the reader, to determine the suitability of, and assume responsibility for, the use of this information. Links to Amazon.com merchandise are provided in association with Amazon.com. Links to eBay searches are provided in association with the eBay partner network.
Copyright: All materials on this web site, including the text, images, and mark-up, are Copyright © 2025 by Stefan Vorkoetter unless otherwise noted. All rights reserved. Unauthorized duplication prohibited. You may link to this site or pages within it, but you may not link directly to images on this site, and you may not copy any material from this site to another web site or other publication without express written permission. You may make copies for your own personal use.



Scott
September 14, 2008
very nice plane! I have a couple ace cores and 400’s. This plane looks fun. would love to see some specs so i could give it a go?